
In this post, we will show you how to Install SquirrelMail on CentOS 7. SquirrelMail is one of the most popular standards-based webmail clients written in PHP. It has built-in clear PHP support for IMAP and SMTP and is designed to render all pages in clear HTML 4.0 with no JavaScript required for maximum compatibility across all browsers.
Installation and configuration are very simple. If you have a VPS with WHM/cPanel or DirectAdmin, SquirrelMail will come with these control panels pre-installed and ready to use. Installing and configuring SquirrelMail on CentOS 7 is not that hard, Follow our guide and you’ll have it installed in no time.
This post assumes that you have at least basic knowledge of Linux, know how to use Windows PowerShell, and most importantly, host your site on your own VPS. The installation is simple and assumes you are running in the root account, if not you may need to add ‘sudo’ to the commands to get root privileges.
We will show you through the step-by-step installation and configuration of SquirrelMail email clients on CentOS 7.
Install And Configure SquirrelMail In Centos7
Before we proceed, SquirrelMail has two requirements that you need to complete.
- A webserver with PHP installed. PHP needs to be at least 4.1.0. PHP 4, PHP 5, and PHP 6 are all supported.
- Access to an IMAP server that supports IMAP 4 rev 1.
Step: 1 Disable SELinux
You can change SELinux mode from target to permissive with the below command:
# vi /etc/SELinux/config
Log in to your server then open the /etc/SELinux/config file and set SELinux To Disable
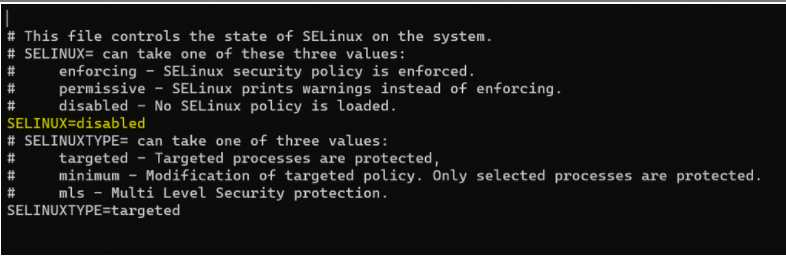
Save and close the file in vi/vim. Reboot the Linux system:
# reboot
Step: 2 Install PostfIx And Configure
Before installing postfix you need to install Epel Repository by the below command.
# yum -y install epel-release
Using the yum installer is always one of the easiest ways to install postfix (ideally if you are using Centos/RHEL > 5 postfix comes pre-installed).
You can check whether postfix centos 7 is already installed or not, by using the below command:
# rpm -qa | grep postfix

If postfix is already installed, you will get the above output. If postfix is not installed, use the command below to install postfix:
# yum install postfix
Keep saying “yes” every time you are asked. Once all the components are downloaded, you will have Postfix CentOS 7 installed successfully.
We need to edit /etc/postfix/main.cf file.
Make changes according to the below steps:
# vi /etc/postfix/main.cf
## Enter your hostname
myhostname = example.localhost.local
## Enter your domain name
mydomain = example.localhost.local
inet_interfaces = all
myorigin = $mydomain
##set your IP range
mynetworks = 192.168.130.138/24, 127.0.0.0/8
## set your mail direcotry
home_mailbox = Maildir/
## Now Go to line no 164 add $domain at the end
mydestination = $myhostname, localhost.$mydomain, localhost, $mydomain

After executing the above command edit the postfix configuration file and make sure all the changes are done properly. Save changes and restart the postfix service.
# systemctl restart postfix
# systemctl enable postfix
Step: 3 Install Dovecot
# yum install dovecot
# systemctl start dovecot
# systemctl enable dovecot
Configuring Dovecot by editing file /etc/dovecot/dovecot.conf
# vi /etc/dovecot/dovecot.conf
protocols = imap pop3 lmtp

Edit file /etc/dovecot/conf.d/10-mail.conf file
# vi /etc/dovecot/conf.d/10-mail.conf
mail_location = maildir:~/Maildir

Edit /etc/dovecot/conf.d/10-auth.conf
# vi /etc/dovecot/conf.d/10-auth.conf
disable_plaintext_auth = yes
auth_mechanisms = plain login

Edit file /etc/dovecot/conf.d/10-master.conf
# vi /etc/dovecot/conf.d/10-master.conf
unix_listener auth-userdb {
#mode = 0600
user = postfix
group = postfix

Start Dovecot service
# systemctl restart dovecot
# systemctl enable dovecot
Step: 4 Install And Configure SquirrelMail In Centos 7
Firstly we need to run apache service
# yum install httpd -y
# systemctl start httpd
# systemctl enable httpd
Install SquirrelMail
# yum install squirrelmail -y

Now configure it according to your server
# cd /usr/share/squirrelmail/config/
# ./conf.pl
After editing and changes press S to save and Q to exit.

Add the following lines at the end (httpd.conf) file
# vi /etc/httpd/conf/httpd.conf
Alias /webmail /usr/share/squirrelmail
<Directory /usr/share/squirrelmail>
Options Indexes FollowSymLinks
RewriteEngine On
AllowOverride All
DirectoryIndex index.php
Order allow,deny
Allow from all
</Directory>
Make sure to save any changes you do in this editing installation.

After adding all these lines and commands restart Apache and dovecot service.
# systemctl restart httpd
# systemctl restart dovecot
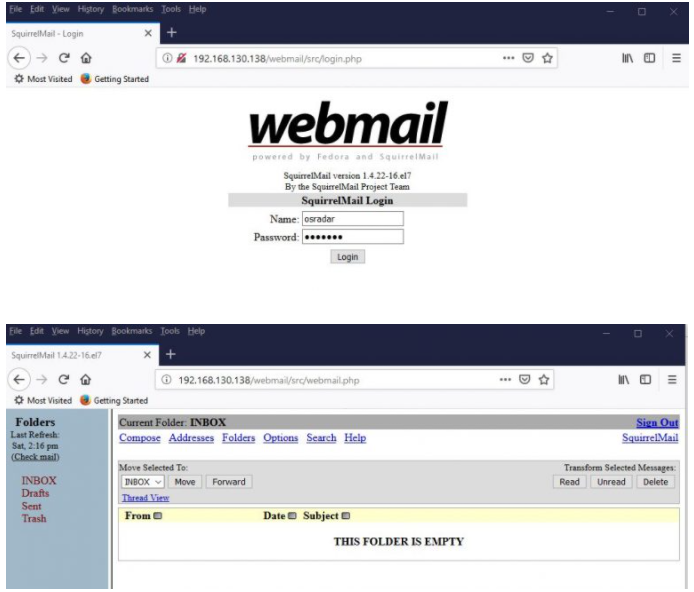
Step: 5 Access Webmail
# adduser osradar
# passwd osradar
Now go to the http://ip-address/webmail or http://domain-name/webmail from your browser.
Final Thought
Have you ever heard about Server Management? If you know about Email Server Management Services then you already know why server management is important.
After Configure SquirrelMail In Centos 7, you just need a server management tool that can help you in managing your server, storage, backups, and networks. In the market, you can easily find tons of server management companies, you can contact them to get your SquirrelMail security.
[If you like How To Configure SquirrelMail In Centos 7: Step by Step Guide, please share it with your friends on social networks or just leave a reply below. Thank you.]