Moving your site to another host can be an overwhelming and upsetting experience, yet it shouldn’t be. Despite the fact that there are significant strides to relocate your site in the event that you follow our guide you can succeed.
The WordPress and Linux server migration services are random and easy to do. Read the guide to know the drills to perform.
Step 1. Backup Your Website Files
Before exporting to the database, make sure you back up every aspect of your site. As in general, it doesn’t matter but, in case of security you need it. Also it is a good practice before any major changes.
There are plenty of wordpress backup plugins that work for you in an easy way. In my advice, you can use WPvivid Backup Plugin absolute convenience and easy backup.
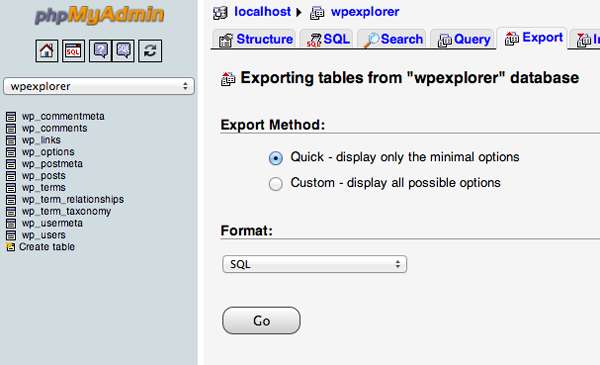
Step 2. Export the WordPress Database
Coming to the export section, there are just about a few processes you need to follow and it’s done. Login to the cPanel account of your web server and open the phpMyAdmin application. Browse and select the database that entail your WordPress installation and click on the Export tab on the navigation menu.
Step 3. Create the WordPress Database on Your New Host Server
When you are done with the exporting database, you are on the move to push that database on your new host server. But before doing so you need to create a surface (environment) for a WordPress installation before the migration to the new web host.
Create a database in the following way:
- Open MySQL Database and create a new database with an appropriate name for your website.
- Create a new MySQL user (with a secure password).
- Add this user account to the new database and grant it All Privileges.
Step 4. Edit the wp-config.php File
Now what? You need to trigger the action that controls the access between WordPress and your database and it can be done through “wp-config.php”. On your local computer browse for the folder where you downloaded your website files. In that folder there is a file called wp-config.php
Make a copy of this file and store it in another folder on your local computer. Come to the original one and make the following changes:
- Change the Database Name
- Change the Database Username
- Change the Database User Password
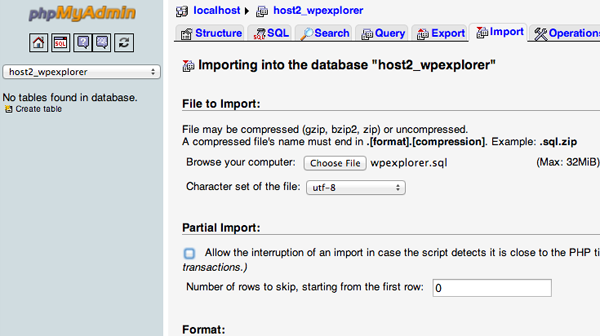
Step 5. Import Your WordPress Database
Almost there! After making specified changes you are set to import the modified database to your new server.
To do so, Go to phpMyAdmin from the cPanel software on your new server and select your new database from the list. From the import tab ‘File to Import’ section click the ‘Choose File’ button and select the SQL file you exported previously.
Uncheck the Partial import check box, make sure the format is defined to SQL and then click the GO button.
Step 6. Upload The WordPress Files To Your New Host
Interfaces with your new web have utilizing your FTP program and peruse the envelope that your site will be held. In the event that this is the essential, or just website being introduced on this web worker at that point transferring the records to the public_html envelope is the typical index.
Try not to erase these records from your nearby PC once the transfer wraps up. They are as yet required until the last advances have been finished.
Step 7. At Last, Final Touches
It’s about a partial drill that should be performed several days between them.
Reconfiguring your domain DNS setting and leaving it for updating usually takes 48 hours. When done, Connect to your old web host to delete the files and database.
In case you find it difficult, you can also contact a server migration company and can easily migrate to any new server.